 A while back, I bought a Seagate “FreeAgent GoFlex Home” network-attached storage (NAS) device - essentially a hard drive with a network port that does not need to be connected to a computer. I had two goals in mind: my digital music collection had outgrown the old PC I use for that purpose, and backups of my various home PCs were a haphazard mess. I could have spent several hundred dollars on a new computer to serve this purpose, but I thought I'd try something new and try my luck with a ~$150 NAS device.
The first thing I did was go through the QuickStart guide to put it on my network and see what it could do. Out of the box, it comes with software to enable automatic backups on up to three PCs, has a clunky but usable interface for copying files onto the drive, and can serve music and video files for any DLNA or UPNP-compatible device on the network to play.
Clunky is not what I was looking for though. I wanted to set up my music and movie library so that once set, I could forget about it and just manage my media using my preferred media player, and could play my music and movies seamlessly on my home theater setup. Fortunately, underneath the less-than-stellar Seagate software is a fully functional Linux operating system with MiniDLNA and Samba pre-installed.
Much of what follows requires having root access on the device, which Seagate would rather you not have (among other reasons, with root access you can easily “brick” the drive if you do not know what you are doing, and presumably Seagate doesn’t want to deal with a lot of service calls and returns for user-inflicted failures). Before going any further, ask yourself if you are willing to risk turning your NAS into an expensive paperweight. That said, the steps I will describe will affect the MiniDLNA server and Samba service but are not likely to crash the operating system itself. As long as you back up the config files before starting, worst case you should be able to copy the backups back into place and be back where you started.
Get Root
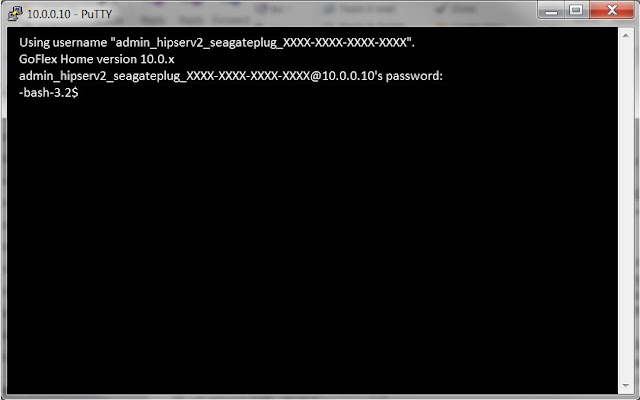
There is a simple method of gaining root access on the GoFlex Home drive. It involves using an ssh client (Linux has one natively; for Windows I like PuTTY) to open a secure shell to the device. The trick is to use the following as the username:
username_hipserv2_seagateplug_XXXX-XXXX-XXXX-XXXX
where username is the user you created when first setting up the NAS, and XXXX-XXXX-XXXX-XXXX is the product key for your device. The result will be a Linux command prompt.

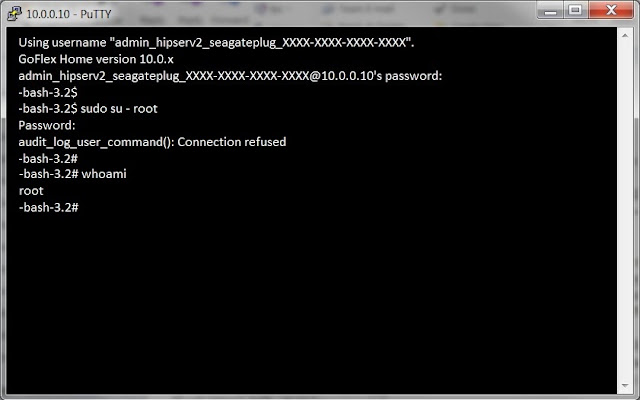
At this point you do not yet have root access – you are merely logged in as a user that has the ability to gain root privileges. The final step is to use sudo (a program built into Linux that allows you to take on the rights of another user, in this case, root):
sudo su – root
Supply your own password again, and now you are logged in as root (which you can verify by running “whoami” at the command line). Note the # at the end of the command prompt, a common notation for superuser access. The audit_log_user_command() error occurs every time I su to root, but doesn’t appear to cause any harm; I suspect the sudo command by default is set up to log superuser access to a location that does not exist, but I’ve never taken the time to investigate.

Fix MiniDLNA
MiniDLNA is open-source media server software (recently updated and renamed as “ReadyMedia”) that will stream music, movies, and pictures to compatible DLNA or UPNP devices (such as PCs, smartphones, tablets, and many newer televisions and Bluray / DVD players). Out of the box, the GoFlex drive puts everything in your Public directory into the media share, but with root access you can configure a variety of things.
Start by making a backup of /etc/miniupnpd/minidlna.conf so you have something to fall back on if things go awry. Then open the file in your favorite text editor and poke around. Much in this conf file is self-explanatory – specify one or more media directories (which can include music, video, pictures, and playlists (in the industry-standard m3u format), specify a location to write the log file to, give the device a friendly name that will show up in your DLNA player. ArchLinux documents some other settings you might play with.
After making any changes to the config file, you will need to stop and restart the miniupnp daemon for the new configuration settings to be loaded:
/etc/init.d/miniupnp –restart
Voila!
Fix Samba
Having control over the media server was a step in the right direction, but I still had the challenge of getting my media files onto the server, and managing the media files and playlists. I used an iPod for a number of years and so became comfortable with iTunes for managing my media; the last thing I wanted to do was manage my media collection through Seagate’s interface.
Here is where Samba comes in. Samba is an open-source program that runs on Unix and Linux variants to implement the SMB/CIFS networking protocol. In simple terms, it allows Linux to share folders in a way that Windows can recognize (thus allowing my media management program to link to individual files through a UNC path instead of through Seagate’s proprietary interface).
The first thing to do was to make a backup of the samba configuration files (I copied the entire directory /etc/samba, which contains both a configuration file for the daemon, as well as files related to Samba users).
Samba uses its own username and password scheme, then maps the Samba username to one or more users on the system of choice (in this case, the Linux OS on the NAS). In practical terms, this means I had to create a Samba user first, then update the smbuser file to associate that user with a Linux user.
-bash-3.2# smbpasswd –a <username>
New SMB password: <password>
Retype new SMB password: <repeat password>
This creates a Samba user, but by itself it is meaningless. The next step is to tell the daemon which system user (or users) will use this Samba user. To do this, I modified the file /etc/samba/smbusers. The syntax is:
<Samba user> = <system users, separated by spaces>
i.e.
nobody = guest pcguest smbguest SYSTEM
In this example, if I log into the Linux system as guest, pcguest, smbguest, or SYSTEM, then Samba will treat me as being logged into the Samba user “nobody” (incidentally, this Samba user does not exist – in the above example the purpose is to prevent guest or unauthenticated users from having any access to the Samba share).
Now that my users were created, I could start working on the Samba configuration file itself, /etc/samba/smb.conf. See the Samba website for a good reference guide to the options in this file. In my case, I was storing music and video files – files that did not been to be kept confidential – so I elected to set up a read-only account to use as a guest account. To do this, I used the following two lines:
Guest account = <guestuser>
Map to guest = bad user
This literally tells the Samba daemon, “if the operating system doesn’t recognize the user, then the user is guest.”
Next, I had to set up the actual shares. The GoFlex NAS is preconfigured to share the “GoFlex Home Personal”, “GoFlex Home Backup”, and “GoFlex Home Public” shares. I wanted slightly more granularity so I could continue to use the backup share for system backups. So, I created a read-only share called “Media” as such:
[Media]
comment = GoFlex Music Share
path="/home/user/GoFlex Home Public/Media"
browseable = yes
guest ok = yes
#read only = yes
writable = yes
public = yes
guest only = yes
valid users = %U
force group = users
I also created a share called “MediaRW” which required a login but could then read and write files. This share is used by the computer on which I use iTunes to manage my library:
[MediaRW]
comment = GoFlex Music Share
path="/home/user/GoFlex Home Public/Media"
browseable = yes
guest ok = no
read only = yes
writable = No
guest only = yes
valid users = <read-write user>
force group = users
With this setup, anyone on my home network can open \\10.0.0.10\Media without any username or password, and can access all my music, video, and playlist files in read-only mode, while anyone with the correct username and password could open \\10.0.0.10\MediaRW to add, change, and delete files – despite the fact that both shares are for the exact same directory on the driver. I can tell iTunes (or any other media manager) that my media library is at \\10.0.0.10\MediaRW. From then on, I can add and remove media, modify playlists, etc. straight from iTunes, not caring one lick that the files are actually now stored on the NAS. There is one missing element, though. MiniDLNA does not create playlists, and it cannot interpret the iTunes native playlists.
iTunesExport and shuffle
Enter iTunes Export, plus a simple shell script I wrote to shuffle the playlists (who wants to listen to the same songs in the same order every time?). iTunes Export is a Java applet that will export playlists from iTunes, to a variety of formats. Since MiniDLNA can read m3u files, that is the format I used. iTunesexport has both a GUI and a command line; I chose to use the command line so I could set up a scheduled task to export the playlists automatically every day. My scheduled task runs the following:
"<path to Java>\java.exe" -jar "<path to itunesexport>\itunesexport.jar" -library="<path to iTunes preferences>\iTunes Music Library.xml" -includePlaylist="Playlist 1","Playlist 2" -outputDir=\\10.0.0.10\MediaRW\Playlists
Shortly afterward, a cron job on my NAS runs a shell script that does the following:
#!/bin/bash
cd /home/admin/GoFlex\ Home\ Public/Media/Playlists/
for f in *.m3u;
do
echo $f
f1="${f}.shuffled"
echo $f1
perl -MList::Util -e 'print List::Util::shuffle <>' "${f}" > "${f1}"
rm "${f}"
mv "${f1}" "${f}"
done
This simply goes through the contents of my Playlists folder, enumerates every filename with a .m3u extension, and sends every file through a Perl shuffle routine to randomly order the lines. Since the m3u format is a simple text file with one line per song / video, randomly ordering the lines in the file simply and effectively randomizes the playlist as it is rendered by my media server.
With that all done, now I can sit back and enjoy my media library, from anywhere on my home network!
